
What is Apache Solr?
Apache Solr is an open-source enterprise search platform designed to provide high-performance, full-text search capabilities. It is developed by the Apache Software Foundation and built on top of Apache Lucene, a highly regarded search library. Solr is used to index and search large volumes of data efficiently, making it a popular choice for businesses and developers needing robust search solutions.
Overview of Apache Solr
1. Key Features
- Full-Text Search: Solr is optimized for full-text search, meaning it can quickly search through vast amounts of text data. It supports various text analysis techniques, including tokenization, stemming, and synonym handling.
- Faceted Search: This feature allows users to refine search results based on different categories or attributes, such as price ranges, product types, or publication dates. Faceted search enhances the user experience by providing more granular control over search results.
- Real-Time Indexing: Solr supports real-time indexing, which means changes to your data are immediately reflected in search results. This is essential for applications where up-to-date information is crucial.
- Scalability: Solr can handle large datasets and high query loads by distributing the data across multiple servers. This scalability ensures that Solr can grow with your data and traffic needs.
- Advanced Querying: Solr supports complex query syntax, allowing for precise searches with multiple criteria. Features like boolean operators, wildcard searches, and proximity searches make Solr a powerful tool for detailed querying.
2. Components of Solr
- Solr Core: A Solr core is a single instance of a search index and its associated configuration. Each core has its own schema, configuration files, and data. You can create multiple cores within a single Solr server to manage different types of data.
- Schema: The schema defines the structure of the data that Solr indexes. It includes field definitions, data types, and indexing rules. Proper schema configuration ensures that data is indexed and queried efficiently.
- Configuration Files: Solr uses several configuration files to manage its behavior. Key files include solrconfig.xml, which defines Solr’s behavior, and schema.xml, which outlines the data structure.
- Indexing: Solr indexes documents using various methods, including batch indexing and real-time indexing. The indexing process involves parsing and storing data in a format optimized for fast searching.
- Query Handling: Solr provides a powerful query interface for users to search through indexed data. It supports both simple queries and complex queries with multiple conditions.
3. Benefits of Using Solr
- High Performance: Solr is designed for speed, enabling rapid indexing and searching even with large datasets. Its efficient algorithms and caching mechanisms ensure quick response times.
- Flexibility: Solr is highly configurable, allowing you to customize its features to fit specific use cases. You can adjust indexing rules, search behaviors, and user interfaces based on your needs.
- Community Support: Being an open-source project, Solr has a large and active community. This means you have access to extensive documentation, forums, and third-party tools to help you implement and optimize Solr for your projects.
4. Use Cases
Solr is used in a variety of applications, from enterprise search solutions to e-commerce platforms and content management systems. Its ability to handle diverse data types and complex search requirements makes it suitable for many industries, including retail, finance, healthcare, and more.
In short, Apache Solr is a powerful search platform that offers advanced search capabilities, scalability, and flexibility. Its robust features and ease of integration make it a valuable tool for building high-performance search engines for various applications.
Without any more wasting time, let's start creating your custom search engine!
Step 1. Install and Start Apache Solr
Step 1.1. Download Apache Solr
- First, download Apache Solr from the official website. For a detailed guide on installation and usage, check out my previous article: Apache Solr Installation and How to Use It.
- Under the Latest Version section, download the zip file for Windows.
Step 1.2. Extract the Apache Solr Zip File
- Once the download is complete, extract the zip file to a folder of your choice (e.g.,
C:\solr).
Step 1.3. Install Java JDK
Apache Solr requires Java, so make sure you have Java JDK installed.
- Download the latest version from the Oracle website.
- Install Java JDK following the on-screen instructions.
- After installation, set the
JAVA_HOMEenvironment variable:- Go to Control Panel → System and Security → System → Advanced System Settings.
- Click Environment Variables.
- Under System variables, click New and add:
- Variable name:
JAVA_HOME - Variable value:
C:\Program Files\Java\jdk_version(replace with your Java installation path).
- Variable name:
- Click OK.
Step 1.4. Start Apache Solr
- Open the Command Prompt and navigate to the Solr folder:
(replacecd C:\solr\solr-x.x.x\binx.x.xwith your Solr version number). - Run the following command to start Solr:
solr start - Solr will start and you can access it at:
http://localhost:8983/solr
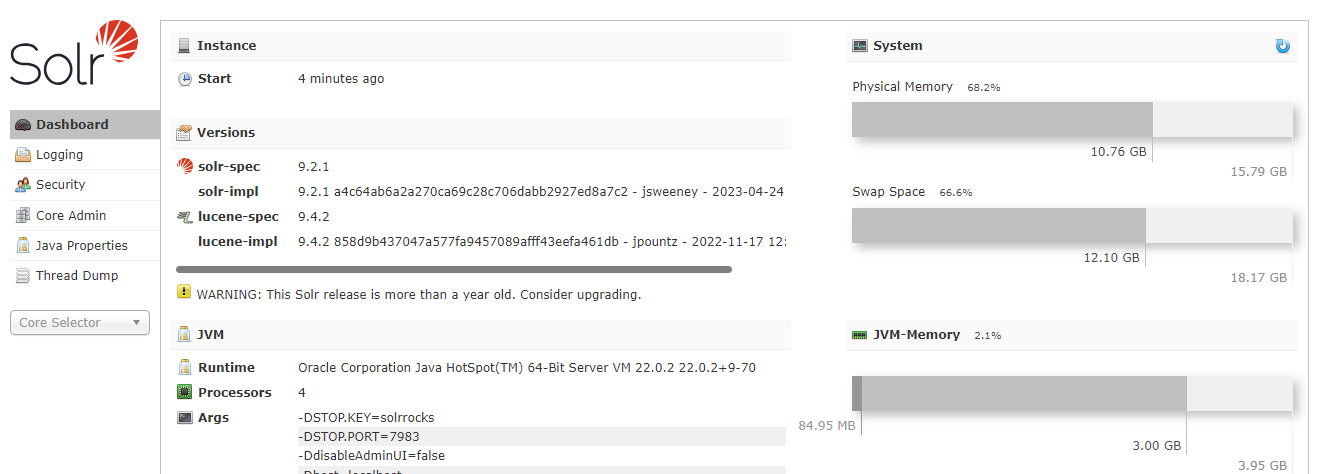
Step 1.5. Verify Solr Installation
- Open a browser and go to
http://localhost:8983/solr. You will see the Solr Admin UI.
Optional: Stop Solr
To stop Solr, run the following command:
solr stop Now, you’ve successfully installed and started Apache Solr on Windows
Step 1.6. Set Up a Solr Core
- Create a new Solr core:
- Navigate to the Solr directory:
(replacecd C:\solr\solr-x.x.x\binx.x.xwith your Solr version). - Create a core (e.g., "mycore") with this command:
You can replacesolr create -c mycoremycorewith any name you want for your core. - The core will be available at
http://localhost:8983/solr/#/~cores/mycore.
- Navigate to the Solr directory:
Step 2. Connect MySQL with Solr Using Data Import Handler (DIH)
Step 2.1. Add the DataImportHandler Dependency
The DataImportHandler is not included by default in some Solr installations. You will need to include it manually.
Steps:
- Download the
solr-dataimporthandlerJAR file for your specific version of Solr.- Go to the Github and find the appropriate version of the
data-import-handler-x.x.x.jarJAR file that matches your Solr installation.
- Go to the Github and find the appropriate version of the
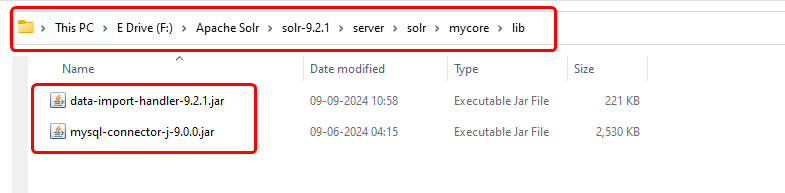
- Place the JAR file in the Solr
libdirectory or a similar directory that Solr loads.
For example:
- Copy the JAR to the
server/solr/[core_name]/lib/directory (create this folder if it doesn’t exist).
Step 2.2. Add DataImportHandler to solrconfig.xml
Ensure that the DataImportHandler is properly configured in your solrconfig.xml file, which is located in your core directory (like solr/[core_name]/conf/solrconfig.xml).
Add the following section to enable the DataImportHandler:
<requestHandler name="/dataimport" class="org.apache.solr.handler.dataimport.DataImportHandler">
    <lst name="defaults">
        <str name="config">data-config.xml</str>
    </lst>
</requestHandler>
This request handler will use the data-config.xml file to define how the data import should be done.
Step 2.3. Create the data-config.xml File
In the core directory (solr/[core_name]/conf/), create a file called data-config.xml. This file contains the instructions on how to pull data from the MySQL database.
Here’s an example data-config.xml configuration for pulling data from a MySQL database:
<dataConfig>
    <dataSource type="JdbcDataSource"
                driver="com.mysql.cj.jdbc.Driver"
                url="jdbc:mysql://localhost:3306/your_database_name"
                user="your_mysql_username"
                password="your_mysql_password" />
    <document>
        <!-- Define an entity for the table you want to index -->
        <entity name="your_table"
                query="SELECT ref, title, description, category FROM your_table_name">
            <field column="ref" name="ref" />
            <field column="title" name="title" />
            <field column="description" name="description" />
            <field column="category" name="category" />
        </entity>
    </document>
</dataConfig>- Replace
your_database_name,your_mysql_username, andyour_mysql_passwordwith your actual MySQL database credentials. - The
queryparameter defines the SQL query that fetches data from your database.
Step 2.4. Add MySQL JDBC Driver
Go to the MySQL Connector/J Download Page
- Open your browser and visit the official MySQL Connector/J download page: MySQL Connector/J Downloads
Choose the Version
- Click on the "Connector/J" tab.
- You will see the latest version of the MySQL Connector/J (the JDBC driver). Click on the "Download" button for the latest stable version.
Skip or Login to Oracle
- You may be prompted to log in to your Oracle account. You can skip this by clicking on "No thanks, just start my download".
Download the ZIP Archive
- On the download page, select the platform-independent ZIP archive (
mysql-connector-java-x.x.x.zip), wherex.x.xis the version number, and click Download.
Extract the ZIP File
- Once the ZIP file is downloaded, go to your Downloads folder, right-click the downloaded file, and choose Extract All.
- Choose a location where you want to extract the contents.
Locate the JDBC JAR File
- Inside the extracted folder, you will find a
mysql-connector-java-x.x.x.jarfile in themysql-connector-java-x.x.xdirectory. This is the JDBC driver file you need to connect MySQL to Solr or any Java-based application.
Add the JAR to Solr or Your Application
- For Solr, place this
.jarfile in thelibdirectory of your Solr core (as mentioned earlier). - If you are using this driver for other purposes (e.g., a Java application), ensure you add this JAR to your project's classpath.
Step 2.5. Restart Solr
After adding the JAR and configuring the solrconfig.xml file, restart your Solr server.
solr restart -p 8983
Step 2.6. Test Data Import
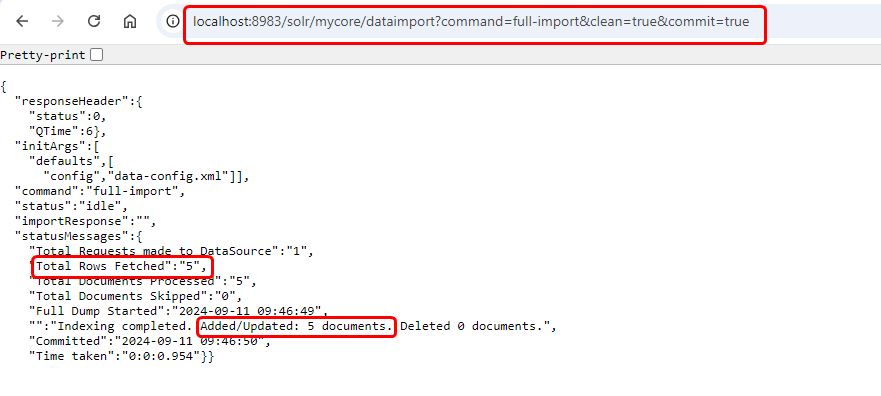
Once everything is set up, you can test the DataImportHandler by accessing the following URL in your browser:
http://localhost:8983/solr/[your_core_name]/dataimport?command=full-import&clean=true&commit=trueThis should trigger a full data import from your MySQL database into Solr. You will see a log message like this:
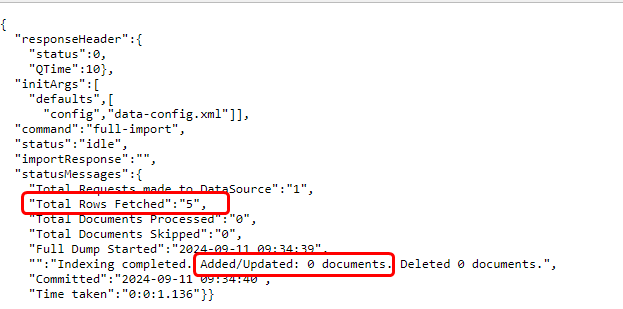
This indicates that while data was fetched from the MySQL database, no documents were added or updated. Documents will only be added once Solr's schema is correctly configured to match the structure of your data. Make sure to review and update your schema to align with the fields in your data.
Step 3. Understand Solr Schema
Once you have successfully connected your SQL database to Solr and imported the data, you need to ensure that Solr's schema is correctly set up to match the structure of your data. The schema defines how your data is indexed and queried in Solr.
Schema in Solr is defined in the managed-schema.xml file (or managed schema in newer versions). It includes:
- Fields: Define what data is stored and how it's indexed.
- Field Types: Specify how fields are processed, including text analysis and indexing.
- Dynamic Fields: Allow fields to be added dynamically without modifying the schema file.
Step 3.1. Create/Modify the Schema
Option A: Using managed-schema.xml
- Locate or Create
managed-schema.xml:- For Solr versions before 8.0, the schema is defined in
solr/mycore/conf/schema.xml. - For Solr versions 8.0 and above, Solr uses the managed schema by default, and you might need to use the Solr Admin UI to make changes.
- For Solr versions before 8.0, the schema is defined in
- Define Fields in
managed-schema.xml: Define fields inmanaged-schema.xmlthat match the structure of your SQL data. For example:<field name="ref" type="string" indexed="true" stored="true" required="true" /> <field name="title" type="text_general" indexed="true" stored="true" /> <field name="description" type="text_general" indexed="true" stored="true" /> <field name="category" type="text_general" indexed="true" stored="true" /> - Reload the Core: After modifying
managed-schema.xml, reload your core to apply the changes:http://localhost:8983/solr/admin/cores?action=RELOAD&core=mycore

Option B: Using Solr Admin UI
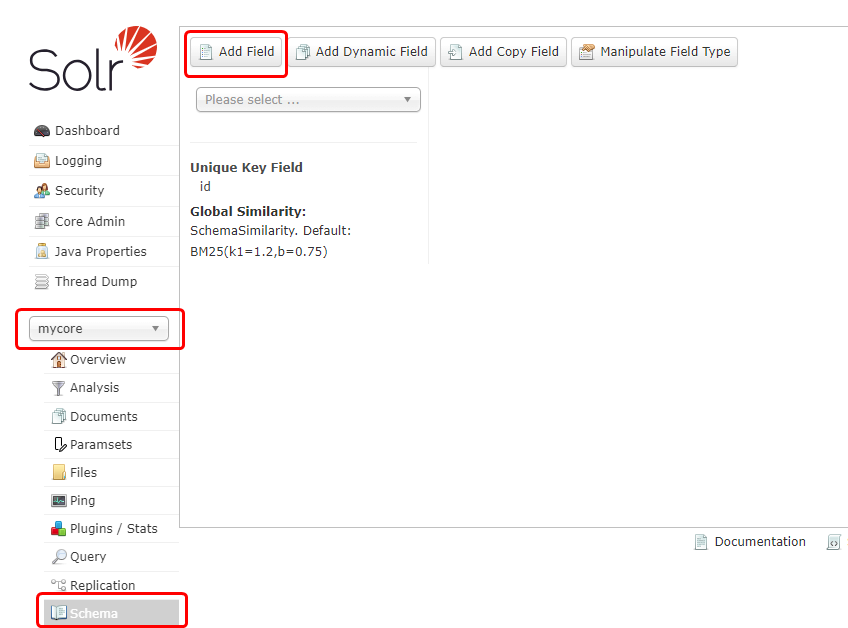
- Access Solr Admin UI: Go to the Solr Admin UI, typically found at
http://localhost:8983/solr/#/[core_name]/schema. - Add a New Field:
- Under the "Schema" section, you'll find a few options for interacting with your schema:
- Fields: Click on the "Add Field" button to create a new field.
- In the popup window, provide the required field attributes such as name, type (e.g.,
string,text_general), stored, indexed, etc. - Click Submit to add the field.
- Under the "Schema" section, you'll find a few options for interacting with your schema:
Step 3.2. Import and Verify Your Data
Once the schema is correctly set up, follow these steps to import your data and view it in Solr:
- Run the Data Import: Access the following URL in your browser to trigger a full data import:
http://localhost:8983/solr/[core_name]/dataimport?command=full-import&clean=true&commit=trueThis will start the import process from your MySQL into Solr.
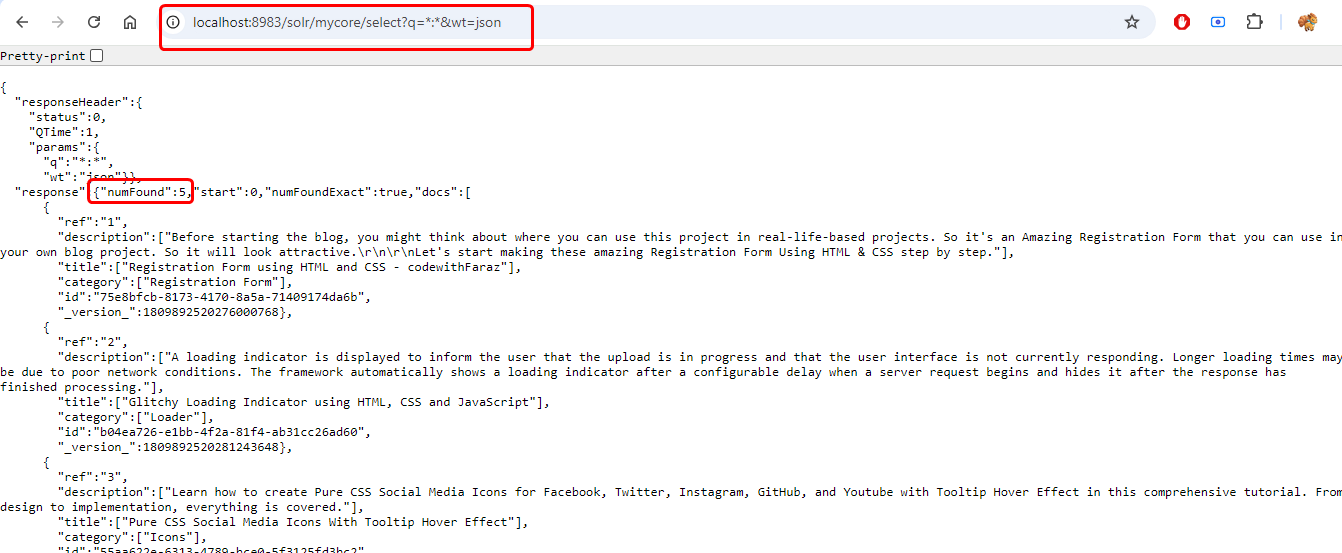
- Verify the Data: After the import is complete, use this URL to query all documents in your core:
http://localhost:8983/solr/[core_name]/select?q=*:*&wt=jsonReplace
[core_name]with the actual name of your core. The query will return all documents in JSON format.
Step 4. Install PHP Solr Client Library
Step 4.1. Download and Install Composer
- Download the Composer-Setup.exe file from the official Composer website: Download Composer
- Run the installer:
- Follow the on-screen instructions.
- When asked to set up PHP, make sure the path to your PHP executable is correct (e.g.,
C:\xampp\php\php.exeif you're using XAMPP). - Ensure the option to add Composer to the system’s PATH is selected during installation.
Step 4.2. Verify Installation
Once installed, verify that Composer is installed correctly:
- Open Command Prompt or PowerShell.
- Run the following command:
This should display the installed version of Composer. If the command is recognized, you're good to go.composer -v
Step 4.3. Install Solarium PHP Client
Create a New PHP Project:
- Navigate to your
xampp/htdocs/folder, where your web projects are stored. - Open the terminal in Visual Studio Code (VS Code).
- Inside
htdocs, create a new folder for your project by running:mkdir solr_test cd solr_test
Install Solarium PHP Library:
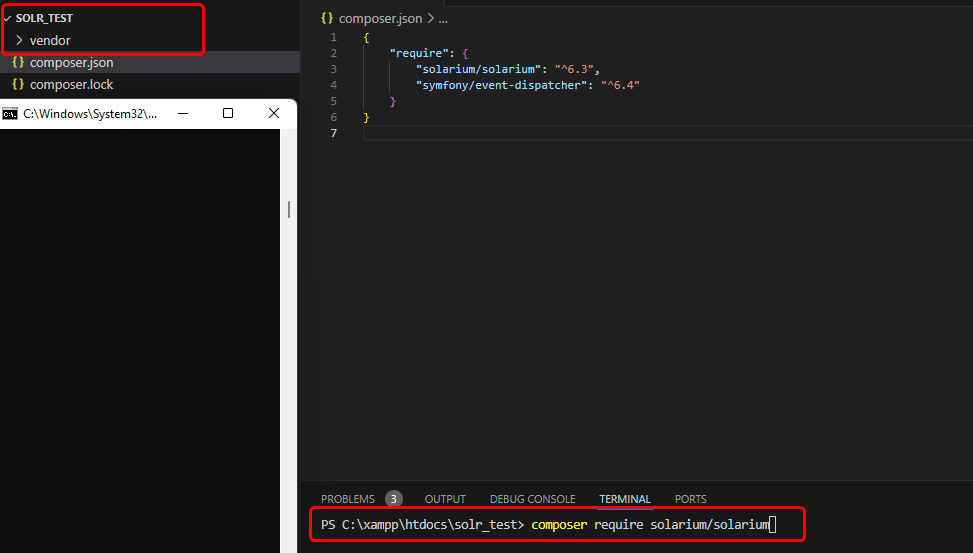
- Once inside your project folder, run the following command to install the Solarium library:
composer require solarium/solarium - This command will download and install the latest version of Solarium, which is a PHP client used for interacting with Apache Solr.
Install Symfony Event Dispatcher:
- If you don't have the symfony/event-dispatcher package installed, you can add it via Composer. Open your command prompt, navigate to your project directory, and run the following command:
composer require symfony/event-dispatcher
Verify Installation:
- After installation, you should see a
vendorfolder in your project directory, which contains the Solarium package. - You can now use the Solarium library in your PHP project to interact with your Solr instance.
Step 5. Create PHP Search Script
Step 5.1. Connect to Solr
Create a new PHP file (solr_search.php) and add the following code to establish a connection to Solr:
<?php
require 'vendor/autoload.php';

use Solarium\Client;
use Solarium\Core\Client\Adapter\Http as HttpAdapter;
use Symfony\Component\EventDispatcher\EventDispatcher;
use Solarium\QueryType\Select\Query\Query;

// Create the HTTP adapter
$adapter = new HttpAdapter();

// Create an event dispatcher
$eventDispatcher = new EventDispatcher();

// Define your Solr endpoint configuration
$endpoints = array(
    'endpoint' => array(
        'localhost' => array(
            'host' => '127.0.0.1',
            'port' => 8983,
            'path' => '/',
            'core' => 'mycore',
        )
    )
);

// Create the Solr client
$client = new Client($adapter, $eventDispatcher, $endpoints);
?>
Step 5.2. Perform a Search Query
Add the following code to handle the search query:
<?php

require 'vendor/autoload.php';

use Solarium\Client;
use Solarium\Core\Client\Adapter\Http as HttpAdapter;
use Symfony\Component\EventDispatcher\EventDispatcher;
use Solarium\QueryType\Select\Query\Query;

// Create the HTTP adapter
$adapter = new HttpAdapter();

// Create an event dispatcher
$eventDispatcher = new EventDispatcher();

// Define Solr endpoint configuration
$endpoints = array(
    'endpoint' => array(
        'localhost' => array(
            'host' => '127.0.0.1',
            'port' => 8983,
            'path' => '/',
            'core' => 'mycore',
        )
    )
);

// Create Solr client
$client = new Client($adapter, $eventDispatcher, $endpoints);

// Create a select query
$query = new Query();

// Get search term from query parameter
$searchTerm = isset($_GET['q']) ? $_GET['q'] : '*:*'; // Default to all records if no query

// Set the query to search within the 'title' field
$query->setQuery('title:' . $searchTerm);

// Optionally set additional query options
$query->setRows(10); // Number of results per page

try {
    // Execute the query
    $resultSet = $client->select($query);
    // Output the results
    echo 'NumFound: '.$resultSet->getNumFound();
    echo "<h1>Search Results</h1>";
    foreach ($resultSet as $document) {
        $title = is_array($document->title) ? implode(', ', $document->title) : $document->title;
        $description = is_array($document->description) ? implode(', ', $document->description) : $document->description;
        echo "<h2>" . htmlspecialchars($title ?? 'No Title') . "</h2>";
        echo "<p>" . htmlspecialchars($description ?? 'No Description') . "</p>";
    }
} catch (Exception $e) {
    echo "<p>Error: " . htmlspecialchars($e->getMessage()) . "</p>";
}

?>
Step 6. Create an HTML Search Form
Create a simple search form in your index.php file:
<!DOCTYPE html>
<html>
<head>
    <title>Solr Search Engine</title>
    <style>
        body {
  font-family: 'Segoe UI', Tahoma, Geneva, Verdana, sans-serif;
  background: linear-gradient(to bottom, #e0e0e0, #ffffff);
  margin: 0;
  padding: 0;
  display: flex;
  justify-content: center;
  align-items: center;
  height: 100vh;
}
.container {
  width: 80%;
  max-width: 600px;
  background: white;
  border-radius: 12px;
  box-shadow: 0 4px 8px rgba(0, 0, 0, 0.2);
  padding: 30px;
  box-sizing: border-box;
  text-align: center;
  position: relative;
  overflow: hidden;
}
header {
  margin-bottom: 30px;
}
h1 {
  color: #333;
  font-size: 2.5rem;
  font-weight: bold;
  margin: 0;
  text-shadow: 1px 1px 2px rgba(0, 0, 0, 0.1);
}
.search-bar {
  display: flex;
  justify-content: center;
  align-items: center;
  position: relative;
}
.search-bar::before {
  content: "";
  position: absolute;
  top: 50%;
  left: 0;
  width: 100%;
  height: 100%;
  background: rgba(0, 102, 204, 0.1);
  border-radius: 24px;
  z-index: -1;
  transform: scale(1.1);
  transition: transform 0.3s;
}
.search-bar:hover::before {
  transform: scale(1.2);
}
.search-bar input {
  width: 70%;
  padding: 12px 20px;
  border: 2px solid #ddd;
  border-radius: 30px;
  font-size: 16px;
  outline: none;
  transition: border-color 0.3s, box-shadow 0.3s;
  background-color: #f9f9f9;
  box-shadow: 0 2px 5px rgba(0, 0, 0, 0.1);
}
.search-bar input:focus {
  border-color: #0066cc;
  box-shadow: 0 4px 8px rgba(0, 102, 204, 0.2);
  background-color: #ffffff;
}
.search-bar button {
  padding: 12px 25px;
  border: none;
  border-radius: 30px;
  background: linear-gradient(to right, #0066cc, #004d99);
  color: white;
  font-size: 16px;
  cursor: pointer;
  margin-left: 15px;
  transition: background 0.3s, transform 0.3s;
  box-shadow: 0 4px 8px rgba(0, 0, 0, 0.1);
}
.search-bar button:hover {
  background: linear-gradient(to right, #004d99, #003366);
  transform: scale(1.05);
}
.search-bar button:active {
  background: #003366;
  transform: scale(1);
}
    </style>
</head>
<body>
<div class="container">
    <form action="solr_search.php" method="GET">
        <header>
            <h1>Advanced Search</h1>
        </header>
        <main>
            <div class="search-bar">
                <input type="text" name="q" placeholder="What are you looking for?">
                <button type="submit">Search</button>
            </div>
        </main>
    </form>
</div>
</body>
</html>
Step 7. Run the PHP Search Application
- Start the Xampp Server.
- Place your files (
index.phpandsolr_search.php) in your web server's document root (e.g.,C:\xampp\htdocs\solr_test). - Open your browser and go to
http://localhost/solr_test/index.php. - Enter a search query and see the results from Solr.

Additional Steps:
- Check Solarium Configuration: Ensure that you are using compatible versions of Solarium and Solr. Check the Solarium documentation for any version-specific details.
- Test Simple Requests: Test a very simple Solr query using cURL or Postman to ensure Solr is responding correctly.
curl "http://localhost:8983/solr/mycore/select?q=*:*&wt=json"This should return JSON results if the core is set up correctly.
- Review Solr Logs: Check Solr’s logs for any errors or warnings that might provide additional clues. (Windows:
path\to\solr\server\logs\solr.log)
Highlighting Feature
Now, if you want to enable highlighting, Solr has a built-in plugin that makes it easy to highlight search terms in specific fields. Here's how you can enable highlighting for the title field:
Step 1: Enable Highlighting for the Title Field
To enable highlighting for the title field, use the getHighlighting() method in Solarium. You can set the fields to be highlighted and customize the highlight appearance by defining a prefix and postfix.
$highlight = $query->getHighlighting();
$highlight->setFields('title');  // Only highlight the 'title' field
$highlight->setSimplePrefix('<strong style="color:red;">');  // Set prefix for highlighted text
$highlight->setSimplePostfix('</strong>');  // Set postfix to close the style
Step 2: Execute the Query
Run the query to retrieve results from Solr. This will include both the documents and any highlighted text for the title field.
try {
    $resultSet = $client->select($query);
} catch (Exception $e) {
    echo "<p>Error: " . htmlspecialchars($e->getMessage()) . "</p>";
}
Step 3: Display Highlighted Results for Title
Loop through the results and check for highlighted content in the title field. If a highlighted part is available, display it; otherwise, display the full title from the document.
<?php
require 'vendor/autoload.php';
use Solarium\Client;
use Solarium\Core\Client\Adapter\Http as HttpAdapter;
use Symfony\Component\EventDispatcher\EventDispatcher;
use Solarium\QueryType\Select\Query\Query;
$adapter = new HttpAdapter();
$eventDispatcher = new EventDispatcher();
$endpoints = array(
'endpoint' => array(
'localhost' => array(
'host' => '127.0.0.1',
'port' => 8983,
'path' => '/',
'core' => 'mycore',
)
)
);
$client = new Client($adapter, $eventDispatcher, $endpoints);
$query = new Query();
$searchTerm = isset($_GET['q']) ? $_GET['q'] : '*:*';
$query->setQuery('title:' . $searchTerm);
$query->setRows(10);
$highlight = $query->getHighlighting();
$highlight->setFields('title');
$highlight->setSimplePrefix('<strong style="color:red;">');
$highlight->setSimplePostfix('</strong>');
try {
$resultSet = $client->select($query);
echo 'NumFound: ' . $resultSet->getNumFound();
echo "<h1>Search Results</h1>";
foreach ($resultSet as $document) {
$highlighting = $resultSet->getHighlighting();
$highlightedDoc = $highlighting->getResult($document->id);
if ($highlightedDoc && $highlightedDoc->getField('title')) {
$title = implode(' ', $highlightedDoc->getField('title'));
} else {
$title = is_array($document->title) ? implode(', ', $document->title) : $document->title;
}
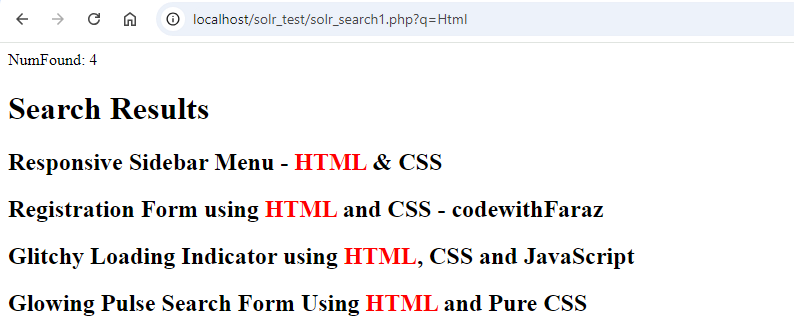
echo "<h2>" . html_entity_decode($title ?? 'No Title') . "</h2>";
}
} catch (Exception $e) {
echo "<p>Error: " . htmlspecialchars($e->getMessage()) . "</p>";
}
?>By following these steps, you will enable highlighting for the title field, allowing you to highlight search terms in a visually distinct way.
Spelling Check Feature
Step 1: Configure Solr for Spellcheck
- Edit the
solrconfig.xmlFile- Navigate to the Solr configuration directory for your core. For example:
solr-9.2.1/server/solr/mycore/conf/. - Open the
solrconfig.xmlfile in a text editor.
- Navigate to the Solr configuration directory for your core. For example:
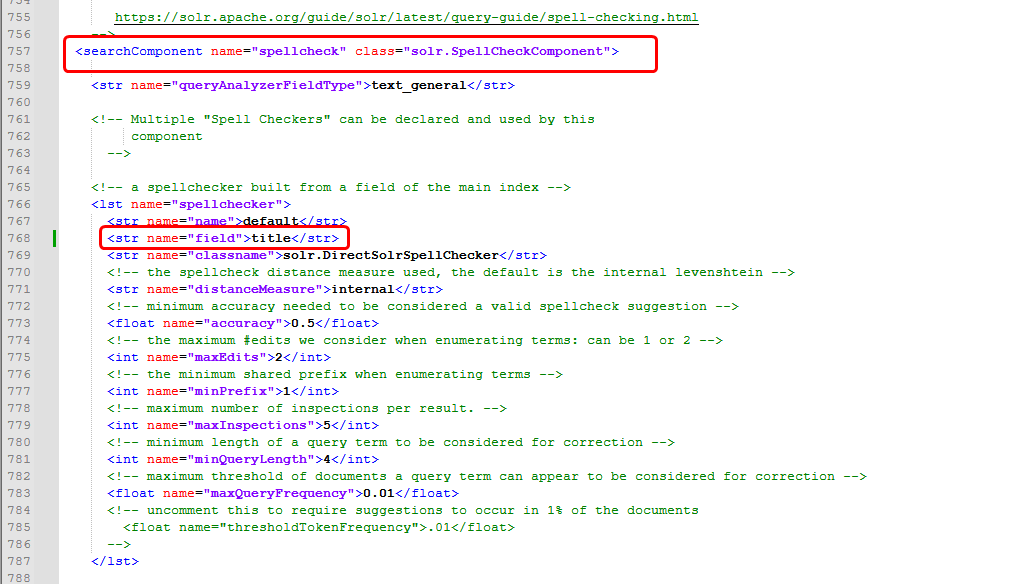
- Add or Modify the Spellcheck Configuration
- Locate the spellcheck configuration section in the
solrconfig.xmlfile. If it's not present, you'll need to add it. - Find the
<str name="field">_text_</str>line and replace_text_with your field name, such astitle. This specifies which field Solr should use for spellchecking.
- Locate the spellcheck configuration section in the
- Save the Changes
- Save the edited
solrconfig.xmlfile.
- Save the edited
- Restart Solr
- To apply the changes, restart your Solr server. You can do this by stopping and starting the Solr service or using the Solr admin UI to restart the core.
solr restart -p 8983 - Test Spellcheck via URL
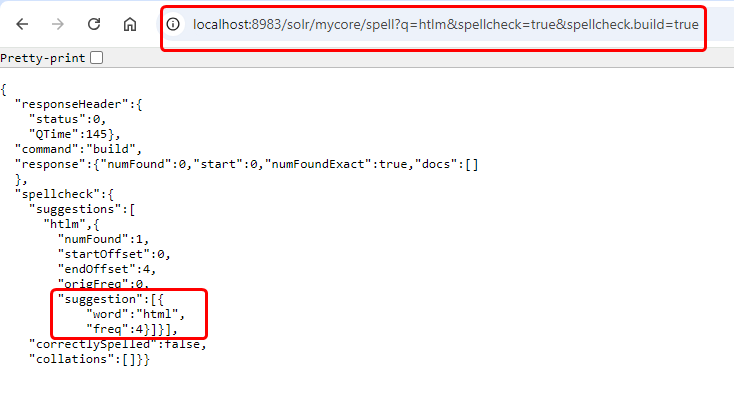
- To test if spellcheck is working, use the following URL in your web browser or a tool like curl:
http://localhost:8983/solr/mycore/spell?q=htlm&spellcheck=true&spellcheck.build=true - Replace
htlmwith any misspelled word you want to test.
- To test if spellcheck is working, use the following URL in your web browser or a tool like curl:
- Verify Results
- Check the response for spellcheck suggestions. You should see suggestions for the misspelled word, which indicates that the spellcheck configuration is working.
- If the response contains suggestions, the spellcheck configuration is correctly set up. If not, verify the configuration and ensure that the Solr server has been restarted correctly.
Step 2: Configure Spellcheck Parameters
To enable spellchecking, set the appropriate parameters in your query. This tells Solr to use the spellcheck component to suggest corrections for misspelled terms.
$query->setHandler('spell'); // Set the Solr handler for spellcheck
$query->addParam('spellcheck', 'true'); // Enable spellcheck
$query->addParam('spellcheck.build', 'true'); // Build spellcheck dictionary
$query->addParam('spellcheck.q', $searchTerm); // Set the query to check spelling for
Step 3: Execute the Query
Run the query to retrieve results and spellcheck suggestions. This step will include both the search results and any spellcheck suggestions if no results are found.
try {
    $resultSet = $client->select($query);
} catch (Exception $e) {
    echo "<p>Error: " . htmlspecialchars($e->getMessage()) . "</p>";
}
Step 4: Process Search Results
Check if any results are found. If results are present, display them as usual.
$rowCount = $resultSet->getNumFound();

if ($rowCount > 0) {
    echo 'NumFound: ' . $rowCount;
    echo "<h1>Search Results</h1>";
    foreach ($resultSet as $document) {
        $title = is_array($document->title) ? implode(', ', $document->title) : $document->title;
        $description = is_array($document->description) ? implode(', ', $document->description) : $document->description;
        echo "<h2>" . htmlspecialchars($title ?? 'No Title') . "</h2>";
        echo "<p>" . htmlspecialchars($description ?? 'No Description') . "</p>";
    }
} else {
    // Proceed to spellcheck suggestions
}
Step 5: Retrieve and Display Spellcheck Suggestions
If no search results are found, retrieve spellcheck suggestions from the response. Parse the response to extract and display suggested corrections.
$resultSet = $client->select($query);

$response = $resultSet->getResponse();
$responseArray = $response->getBody();
$responseData = json_decode($responseArray, true);

if (isset($responseData['spellcheck']['suggestions']) && !empty($responseData['spellcheck']['suggestions'])) {
    foreach ($responseData['spellcheck']['suggestions'] as $suggestions) {
        if (is_array($suggestions) && isset($suggestions['suggestion'])) {
            $suggestionsList = [];
            foreach ($suggestions['suggestion'] as $suggestion) {
                if (is_array($suggestion) && isset($suggestion['word'])) {
                    $suggestionsList[] = $suggestion['word'];
                }
            }
            echo 'Did you mean: <span style="color:red;font-weight:bold;">' . implode(', ', $suggestionsList) . '?</span>';
        }
    }
} else {
    echo '<p>No records found.</p>';
}
Full Code for Spelling Check Feature
<?php

require 'vendor/autoload.php';

use Solarium\Client;
use Solarium\Core\Client\Adapter\Http as HttpAdapter;
use Symfony\Component\EventDispatcher\EventDispatcher;
use Solarium\QueryType\Select\Query\Query;

$adapter = new HttpAdapter();
$eventDispatcher = new EventDispatcher();

$endpoints = array(
    'endpoint' => array(
        'localhost' => array(
            'host' => '127.0.0.1',
            'port' => 8983,
            'path' => '/',
            'core' => 'mycore',
        )
    )
);

$client = new Client($adapter, $eventDispatcher, $endpoints);
$query = new Query();
$searchTerm = isset($_GET['q']) ? $_GET['q'] : '*:*';
$query->setQuery('title:' . $searchTerm);
$query->setRows(10);

try {
    $resultSet = $client->select($query);
    $rowCount = $resultSet->getNumFound();

    if ($rowCount > 0) {
        echo 'NumFound: ' . $rowCount;
        echo "<h1>Search Results</h1>";
        foreach ($resultSet as $document) {
            $title = is_array($document->title) ? implode(', ', $document->title) : $document->title;
            $description = is_array($document->description) ? implode(', ', $document->description) : $document->description;
            echo "<h2>" . htmlspecialchars($title ?? 'No Title') . "</h2>";
            echo "<p>" . htmlspecialchars($description ?? 'No Description') . "</p>";
        }
    } else {
        // No results found, check for spellcheck suggestions
        $query->setHandler('spell');
        $query->addParam('spellcheck', 'true');
        $query->addParam('spellcheck.build', 'true');
        $query->addParam('spellcheck.q', $searchTerm);

        $resultSet = $client->select($query);
        $response = $resultSet->getResponse();
        $responseArray = $response->getBody();
        $responseData = json_decode($responseArray, true);

        if (isset($responseData['spellcheck']['suggestions']) && !empty($responseData['spellcheck']['suggestions'])) {
            foreach ($responseData['spellcheck']['suggestions'] as $suggestions) {
                if (is_array($suggestions) && isset($suggestions['suggestion'])) {
                    $suggestionsList = [];
                    foreach ($suggestions['suggestion'] as $suggestion) {
                        if (is_array($suggestion) && isset($suggestion['word'])) {
                            $suggestionsList[] = $suggestion['word'];
                        }
                    }
                    echo 'Did you mean: <span style="color:red;font-weight:bold;">' . implode(', ', $suggestionsList) . '?</span>';
                }
            }
        } else {
            echo '<p>No records found.</p>';
        }
    }
} catch (Exception $e) {
    echo "<p>Error: " . htmlspecialchars($e->getMessage()) . "</p>";
}?>
Suggestion Feature
Step 1: Configure Solr for Suggester
- Edit the
solrconfig.xmlFile- Navigate to the Solr configuration directory for your core. For example:
solr-9.2.1/server/solr/mycore/conf/. - Open the
solrconfig.xmlfile in a text editor.
- Navigate to the Solr configuration directory for your core. For example:
- Add Suggester Configuration
- Ensure that your
solrconfig.xmlincludes the suggest component configuration. If it’s not already configured, add it like this:<searchComponent name="suggest" class="solr.SuggestComponent"> <lst name="suggester"> <str name="name">mySuggester</str> <str name="lookupImpl">AnalyzingInfixLookupFactory</str> <str name="dictionaryImpl">DocumentDictionaryFactory</str> <str name="field">title</str> <str name="suggestAnalyzerFieldType">text_general</str> <str name="buildOnCommit">true</str> <str name="buildOnOptimize">true</str> </lst> </searchComponent> <requestHandler name="/suggest" class="solr.SearchHandler" startup="lazy"> <lst name="defaults"> <str name="suggest">true</str> <str name="suggest.dictionary">mySuggester</str> <str name="suggest.count">5</str> </lst> <arr name="components"> <str>suggest</str> </arr> </requestHandler>field: Field to be used for suggestions.
- Ensure that your
- Save the Changes
- Save the edited
solrconfig.xmlfile.
- Save the edited
- Restart Solr
- To apply the changes, restart your Solr server. You can do this by stopping and starting the Solr service or using the Solr admin UI to restart the core.
solr restart -p 8983 - Test Suggester via URL
- To test if the suggester is working, use the following URL in your web browser or a tool like curl:
orhttp://localhost:8983/solr/mycore/suggest?suggest=true&suggest.build=true&suggest.dictionary=mySuggester&suggest.q=regishttp://localhost:8983/solr/mycore/suggest?q=regis&suggest=true&suggest.count=5 - Replace
regiswith any word you want to test.
- To test if the suggester is working, use the following URL in your web browser or a tool like curl:
- Verify Results
- Check the response for suggestions. You should see suggestions for the word, which indicates that the suggestions configuration is working.
- If the response contains suggestions, the suggester configuration is correctly set up. If not, verify the configuration and ensure that the Solr server has been restarted correctly.

Step 2: Create a Suggester Query
In your PHP script, create a query for getting suggestions. Use the Solarium library to interface with Solr.
$query = $client->createSuggester();
$query->setDictionary('mySuggester'); // Name of the suggester component
$query->setQuery($searchTerm); // The term to suggest
$query->setCount(5); // Number of suggestions
Step 3: Execute the Suggester Query
Run the suggester query to get results.
$result = $client->suggester($query);Step 4: Parse and Display Suggestions
Process the results to extract and display suggestions.
$suggestions = $result->getResults();

foreach ($suggestions as $suggestionResults) {
    foreach ($suggestionResults as $suggestionResult) {
        $suggestionsList = $suggestionResult->getSuggestions();

        foreach ($suggestionsList as $suggestion) {
            echo 'Suggestion: ' . htmlspecialchars($suggestion['term']) . '<br>';
        }
    }
}
Full Code for Suggestion Feature
<?php

require 'vendor/autoload.php';

use Solarium\Client;
use Solarium\Core\Client\Adapter\Http as HttpAdapter;
use Symfony\Component\EventDispatcher\EventDispatcher;
use Solarium\QueryType\Select\Query\Query;

$adapter = new HttpAdapter();
$eventDispatcher = new EventDispatcher();

$endpoints = array(
    'endpoint' => array(
        'localhost' => array(
            'host' => '127.0.0.1',
            'port' => 8983,
            'path' => '/',
            'core' => 'mycore',
        )
    )
);

$client = new Client($adapter, $eventDispatcher, $endpoints);
$query = new Query();
$searchTerm = isset($_GET['q']) ? $_GET['q'] : '*:*';
$query->setQuery('title:' . $searchTerm);
$query->setRows(10);

try {
    $resultSet = $client->select($query);

    $rowCount = $resultSet->getNumFound();
    if ($rowCount > 0) {
        echo 'NumFound: ' . $rowCount;
        echo "<h1>Search Results</h1>";
        foreach ($resultSet as $document) {
            $title = is_array($document->title) ? implode(', ', $document->title) : $document->title;
            $description = is_array($document->description) ? implode(', ', $document->description) : $document->description;
            echo "<h2>" . htmlspecialchars($title ?? 'No Title') . "</h2>";
            echo "<p>" . htmlspecialchars($description ?? 'No Description') . "</p>";
        }
    } else {
        $query = $client->createSuggester();

        $query->setDictionary('mySuggester'); // Name of the suggester component
        $query->setQuery($searchTerm); // The term to suggest
        $query->setCount(5); // Number of suggestions

        // Execute the query
        $result = $client->suggester($query);

        // Parse and display the suggestions
        $suggestions = $result->getResults();
        foreach ($suggestions as $suggestionResults) {
            // Loop through each suggestion result
            foreach ($suggestionResults as $suggestionResult) {
                // Extract the term suggestions (the array of suggestions)
                $suggestionsList = $suggestionResult->getSuggestions();
                foreach ($suggestionsList as $suggestion) {
                    echo 'Suggestion: ' . $suggestion['term'] . PHP_EOL;
                }
            }
        }
    }
} catch (Exception $e) {
    echo "<p>Error: " . htmlspecialchars($e->getMessage()) . "</p>";
}
?>
Conclusion
Building your own search engine with Apache Solr, PHP, and MySQL can significantly enhance your website or application's search functionality. By following this guide, you can set up a robust search engine and add advanced features like highlighting, spell check, and suggestions. These enhancements will improve user satisfaction and make your search engine a valuable tool for finding information.
